Hey there, food lovers! Are you ready for a sweet treat that’s just as irresistible as it is easy to make? This Starbucks Cake Pop recipe comes together in about 30 minutes and is a no-bake delight that your family will love! It’s perfect for those busy afternoons when you crave something sweet but don’t want to spend hours in the kitchen. You can also switch up the flavors to suit your taste or use it as a fun way to clean out the fridge! Trust me it’s going to become your go-to recipe for a delicious pick-me-up!
Ingredient Breakdown
Let’s dive into what you need to whip up these delicious little bites of joy. Here’s the breakdown:
- 1 box vanilla cake mix: You can use any flavor you like, chocolate would be a treat too!
- 1/2 cup frosting: Store-bought or homemade, whatever makes your heart sing.
- 1 cup melted candy (e.g., candy melts): This is where the magic happens, use colors to match themes!
- Lollipop sticks: These are essential for popping!
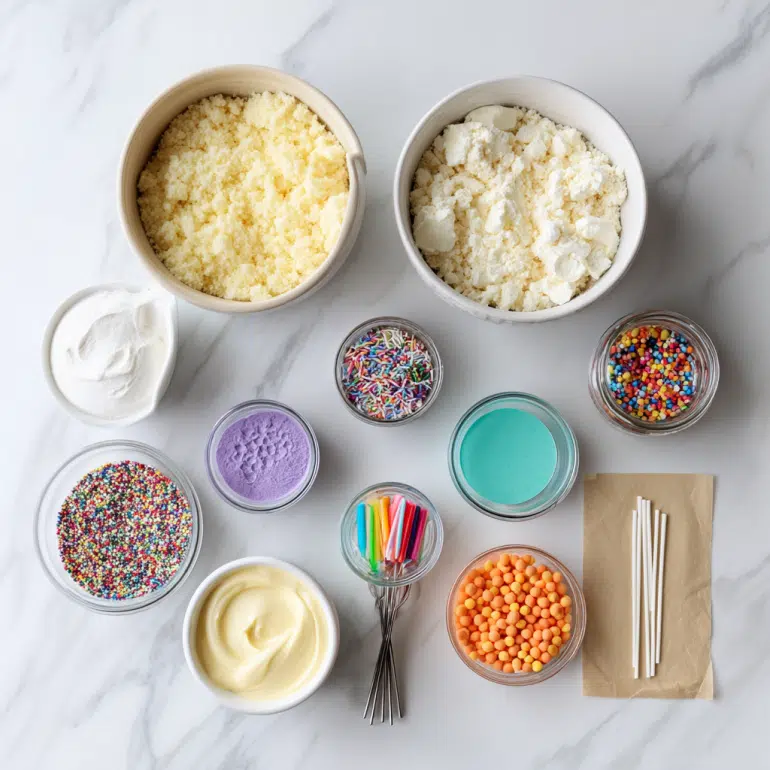
Feel free to get creative with toppings or sprinkles to add that personal touch, you can even adorn them with crushed nuts or coconut if you like!
Step-by-Step Instructions
How to Make Starbucks Cake Pops
Okay, let’s get cooking! This process is so simple and fun; your kids could even help (and trust me, they’ll love it too!). Here’s how you do it:
Bake the cake: Start by baking the vanilla cake mix according to the package instructions, usually about 25-30 minutes. The house will smell amazing, I promise! Just make sure it’s a light golden color. Once done, take it out and let it cool completely like, completely cool. Nobody wants a gooey mess here!
Crumble the cake: After the cake has cooled, grab a large bowl and crumble the cake into it. You want it to be fine and fluffy think clouds, so mash it up well!
Add the frosting: Next, grab your frosting and mix it into the crumbled cake. I usually start with half a cup but add it gradually until it feels right. You want it to be sticky enough to hold together but not so sticky that it’s just a big gooey mess. Mix well until it’s thoroughly combined, it’s gonna be sticky and oh-so-yummy.
Shape the cake pops: Now for the fun part! Roll the mixture into small balls, about the size of a tablespoon. Place them on a baking sheet lined with parchment paper.
Insert the sticks: Time to add the lollipop sticks! Dip the tip of each stick into the melted candy then insert it into each cake ball. This little step will really help secure the stick.
Dip in candy: Here comes the part that makes everything look adorable! Dip each cake pop into the melted candy, making sure it’s fully coated. Swirl it around a bit so it gets that smooth, shiny finish. Don’t forget to let the excess candy drip back into the bowl!
Rest and set: Now, place the pops upright in a foam block or cake pop stand, although I’ve used a potato in a pinch! Let them set until the candy hardens, which should take about 15-20 minutes.
Serve and enjoy! Once the chocolate has set, they’re ready to eat! Feel free to drizzle more melted chocolate on top or decorate with sprinkles for a burst of color!

Why I Love This Recipe
Honestly, this is my go-to recipe when I’m feeling a little extra and want to impress my friends (or my kids!). I’m a real sucker for anything that’s bite-sized and sugary, and these cake pops check all the boxes. They’re fun to make, and you can customize them however you like flavors, colors, toppings…you name it! The best part is they’re great for any occasion, from birthday parties to cozy family nights in. Plus, I’m pretty sure they taste even better when made together with the kiddos in the kitchen!
If you loved this Starbucks Cake Pop recipe, be sure to check out my Best Chocolate Chip Cookies, my Simple Banana Bread, or my Ultimate Brownie Recipe!
Why This Recipe Works
Easy and Quick
This recipe comes together in under 30 minutes, making it super quick and easy! With minimal prep and baking time, it’s perfect for busy weeknights or last-minute gatherings.
Customizable
You can get as creative as you want with flavors and decorations. Use whatever you have on hand, whether that’s a different cake mix or your favorite frosting. This recipe allows you to customize every bite!
Kid-Friendly
The whole family will love it! Kids enjoy making these little treats, and they’re fun to eat too. Plus, it’s a great way to get them involved in the kitchen, and who hates getting a little messy?
Perfect for Parties
These cake pops are a crowd-pleaser! Whether it’s a birthday party or a casual afternoon with friends, cake pops grab everyone’s attention. They’re cute, portable, and great for sharing, no forks required!
Serving and Storage Tips
What to Serve With This
These cake pops are delightful on their own, but pair them with a nice cup of coffee or hot chocolate, and you’re in heaven. They can also be served alongside other treats to make a dessert platter that’ll impress anyone!
How Long They Keep
You can store these cake pops for about 1 week in the fridge. Just make sure they’re in an airtight container to keep them fresh.
Reheating Instructions
While you hopefully won’t have too many leftovers (because they’re THAT good), you simply let them sit at room temperature for a few minutes before devouring. No need for reheating, they’re best enjoyed cold!
Freezer Friendly
Want to make these ahead of time? Yes, they are freezer friendly! Just pop them in an airtight container, and they’ll last up to 3 months. To enjoy, pull them out and let them thaw in the fridge overnight before serving.
And there you have it my Quick and Easy Starbucks Cake Pop Recipe! This delightful treat is not just a recipe but a fun experience that brings the family together. With tons of flavors and colors to play with, they’ll become your new sweet addiction (like they have for me!). Let me know how yours turn out, and keep cooking with love! ♥
Feel free to drop your comments below, and let’s keep the conversation going! If you have any questions or just want to share your baking adventures. I’m all ears! Happy baking!